How to Install Metal Roofing

Choosing the right metal roofing is a big investment and is best left to a professional contractor. Whether you are replacing your existing roof or building a new structure, a metal roof can add beauty, style, and value to your home or commercial project. The benefits of a metal roof include longevity, durability, energy efficiency, and fire resistance. Contact Metal Roofing Columbus GA now!

Unlike tiles and shingles, which must be replaced frequently or can come loose during storms, metal roofs can withstand high winds and heavy snow loads. They are also long-lasting and can last 50 years or more with minimal maintenance requirements.

When choosing a metal roof, it is important to choose a product that has been certified by an independent testing lab (such as the Underwriters Laboratory) and comes with a lengthy manufacturer’s warranty. Also, consider choosing a contractor that offers a labor and materials warranty on the installation.

Start with removing all the old shingle and wood decking, making sure to dispose of it properly in a debris container. Then install the underlayment. It’s important to use an underlayment that is water-resistant, such as synthetic underlayment. It is not recommended to use asphalt felt underlayment, as it doesn’t hold up to the elements well.

Once the underlayment is in place, begin installing your metal panels. It’s important to overlap each panel by at least 3 in (7.6 cm). Once all the panels are in place, join them with metal seam clips to ensure that they are securely fastened.

A roof is an important part of a home, and the material it’s made from affects many aspects of its function and design. When choosing a roofing material, consider its lifespan, durability, water resistance, insulation needs and visual appeal.

There are many different types of roof materials, each with its own benefits and drawbacks. Some are more cost-effective, while others offer better fire resistance or energy efficiency. Some may be more suitable for certain climates or architectural styles. It’s also important to consider the installation and maintenance requirements of each type of roof.

The most common roofing materials include asphalt shingles, clay tiles, concrete tiles and metal. Asphalt shingles are the most affordable and durable, and come in a wide variety of colors and styles. They are easy to install and are resistant to rot and insect damage. These shingles are also relatively lightweight, which can reduce the amount of stress on the structure of the house.

Concrete tile is another durable option that can mimic the look of many other types of roofing materials. It’s also fireproof (class A), waterproof, and impervious to fungus and other microorganisms. However, it can be expensive and difficult to work with. It’s also a good idea to use flashing, which is a protective layer that prevents leaks at the joints of the roof.

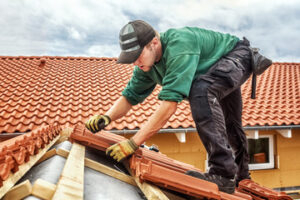
Tile roofs are an attractive and durable roofing option that can last for over 50 years. They are available in a wide range of shapes and styles, from Mission-style round topped tiles to French-style flat roofs. This type of roof is best suited for warmer climates, as it tends to absorb moisture and become brittle in cold weather.

Metal roofing is a stylish and durable roofing option that can last up to 70 years. It can be made from corrugated or standing seam metal, and is available in a range of finishes to match the style of the house. It is also energy efficient, as it can reflect heat rather than absorb it. It is also highly recyclable, which makes it a sustainable choice.

Design

The roof may be a home’s most visible feature, but its design goes well beyond its aesthetic. From the gently sloping shingles of cozy cottages to the dramatically pitched copper roofs of European cathedrals, every roof is uniquely designed to suit its climate and architectural style. In addition, the design of a roof can also affect how it functions.

For example, the slope (also known as the pitch) of a roof is important to its ability to shed water. A roof with a steeper pitch is more likely to shed water faster than a roof with a shallower pitch.

Other design considerations include the location of plumbing vents and other penetrations. All new and re-roofing projects should thoroughly pursue moving penetrations to the least exposed side of the roof.

Installation

A home’s roof is its main barrier to the weather. It protects a structure’s inhabitants from extreme heat and cold and keeps water from seeping in. Nevertheless, many people do not fully understand the role of roofing or what goes into its installation and maintenance.

When installing shingles, a contractor will first put down underlayment, which is a waterproof membrane that prevents leaks and shingle damage even if the outer layer suffers minor damage. Then, he will nail the shingles in a pattern that overlaps by six inches. The cap nails will be closer together at the edges and spread out more towards the center.

Before a roofing project begins, the homeowner should mow the yard and move all objects from the house (such as cars or patio furniture). He should also cover landscaping with tarps, position garbage cans to prevent rainwater from falling into them, and remove or flag any items that could fall off the roof during construction.

Maintenance

The roof acts as the main barrier between your home or commercial space and the weather. It should be inspected regularly to ensure its integrity and longevity. Detecting and repairing small problems before they escalate into major issues can save you thousands of dollars down the road.

Look for a variety of signs of wear and tear. Depending on the season, these may include:

Loose, cracked, or curled shingles Missing granules (which expose the asphalt layer and accelerate shingle deterioration) Broken or damaged flashing

Water leaks around chimneys, vent pipes, skylights, or other penetrations can damage the roof covering and lead to structural damage. Checking the caulking on a regular basis and re-caulking as necessary will help prevent water leaks.

Inspect for rust and other metal degradation on the underside of the roof, especially near the edges. A roof is more vulnerable to wind and sun exposure than the rest of the structure, so these areas require special attention.

Keep drains clear of debris such as dirt, leaves, and twigs. If left to accumulate, this can prevent water from flowing into roof drains and cause ponding, which can lead to premature damage or leaks.

Trimming the growth of trees near your home or commercial space can protect it from branches that might fall during a storm. This can also reduce the risk of damage from flying debris caused by strong winds and natural disasters like tornadoes and hurricanes. A regular roof inspection should be done by a trained professional on a routine basis. This should be recorded in writing so that problems are addressed before they become serious.

Leaks

If a roof is not routinely maintained, it can quickly deteriorate and require major repairs. This can increase the life-cycle cost of a roofing system, and may also put interior valuables at risk. In addition, untreated deterioration can result in a warranty being voided. Performing maintenance on the roof, including a regularly scheduled inspection, can help to extend the life of the roofing system and reduce the overall life cycle costs. This is especially important for facilities that utilize a large amount of energy, as a less efficient roof can lead to high energy bills.

Repairs

When it comes to addressing roofing damage, repairs can often make the difference between saving your roof and replacing it. But it’s important to understand the differences between repairing and replacing a roof, so you can make an informed decision about your home improvement project.

Roofing professionals can replace worn out shingles, tar paper, and flashing, as well as seal up gaps to prevent water intrusion. But when the extent of damage to your roof is too severe, a full replacement may be necessary.

Generally, a complete tear-off and replacement requires a permit. This is especially true for older buildings and those located in Landmark Districts or Historic districts, as these types of projects have specialized requirements that must be met. In many cases, it’s best to have a licensed contractor pull the permit, as they’ll be familiar with the process and requirements. A permit also allows you to get the warranty coverage you need, ensuring peace of mind and proper protection for your investment.

Protecting Your Home During Roofing Installation

A roofing job is a physically demanding, highly repetitive work. Roofers use ladders to reach high areas of the roof and take precautions to protect themselves and the property from damage.

Roofing

Roofing materials vary by budget, climate and aesthetic preferences. Shingles come in a variety of colors and styles, from tab shingles to architectural shingles. Proper ventilation is essential for a healthy roof, so the team may also install ridge vents and soffit vents. Contact Sun City Roofing for professional help.

Whether you’re roofing your home or replacing a commercial roof, it’s always wise to prepare for the work ahead of time. It not only helps ensure that your roofing project goes as smoothly as possible, but it can also help protect your property and belongings from damage while the roof is under construction.

Depending on the type of coating system you’re having applied, your roofing surface may need to be clean in order to achieve proper adhesion. A buildup of dirt, grease, contaminants, tools, moisture, and loose debris can interfere with the effectiveness of the coating system and even cause it to detach from your roof.

It’s also a good idea to cover your driveway or walkways with tarps to keep shingles, nails and other construction debris from damaging them. You should also make sure that the crew has free access to your garage or other parking areas so that they can unload equipment and materials quickly. This is particularly important in urban neighborhoods where there are often crowded streets and alleyways.

The roofing installation process is noisy and can shake your house and knock items off walls, especially if it’s being done on the top floor. That’s why it’s a good idea to take down wall decorations like mirrors, framed photos and wreaths before the job begins. It’s a simple precaution that will save you the hassle and expense of repairing or replacing them later.

Children and pets should be kept away from the work area as well. The presence of strangers, loud noises and changes to the environment can be stressful or dangerous for them. It might be best to have them stay with grandparents or a neighbor during the construction period.

Before the roofing contractor arrives, you should also go through your yard to mark or protect any plants or lawn ornaments that could be damaged by the roofers’ work. If you have a koi pond in your garden, for example, you can mark it with orange tape to make sure the roofers avoid it. This will keep your landscaping looking its best while the roof is being installed and also protect it from any dropped shingle fragments.

Laying the Underlayment

A roof underlayment is an extra layer of protection between your roofing materials and the wood framing underneath. This prevents moisture from leaking through the top layers of shingles and causing damage. It also prevents water from soaking into the roof deck and weakening it over time. In addition to being a water barrier, underlayment also helps protect your home from ice dams.

If you’re considering a new roof, or even a re-roofing project, the first step in the process is to roll out the underlayment. This is a felt (15lb or 30lb), synthetic, or other material that adds an extra level of security to your roof’s deck (the wooden framework). It provides additional protection from rain and ice and can help protect the underlying sheathing from dampness.

The best underlayment will depend on several factors, including the type of roof, climate, and your roofing materials. Roofing felt is a great choice for traditional shingle roofs, but synthetic underlayments are better suited to metal and other modern roofing systems. They’re more resistant to heat and have a non-slip surface that’s safer for roofers to walk on.

While underlayment is important, it’s not a replacement for proper roof ventilation. It’s crucial to ensure that your attic is well ventilated to reduce ice dam build up and keep the attic cool, which can extend the life of your roofing materials. This will help reduce your energy bills and keep moisture out of the attic.

Once the underlayment is in place, the roofers will begin to shingle the roof. They’ll start by laying the drip edge and WSU to provide waterproofing, then they’ll lay the first row of underlayment. They’ll overlap the first row with the next by at least six inches and nail it down firmly. They’ll repeat this pattern, overlapping and nailing each row until they reach the ridge.

It’s important to note that roofing work can be dangerous, and should always be done by licensed roofers. Be sure to follow the safety protocols for your particular roofing products and consult with a professional if you’re not comfortable working on a roof.

Installing the Shingles

If you’re planning to install a new asphalt shingle roof, you’ll want to take some extra steps to protect your home and ensure the longevity of your new roofing materials. Start by removing any old shingles and underlayment, and don’t forget to remove or cover anything that might be in the way of your work area—including landscaping, patio furniture, tarps, and a dumpster (if needed). Renting a dumpster or having one nearby will make clean up much easier when you’re finished. If there are any movable items near your house, move them or cover them with tarps to avoid damage from protruding nails.

You’ll also need to install a drip edge, which is a strip of water-resistant material that runs along the bottom edge of the roof. The drip edge should be close to the edge of the fascia board but not touching it, and it should be nailed down with 1-1/4-inch roofing nails. This will help prevent water from seeping under the shingles, and it’s also a good idea to use this technique around any valleys or other areas of the roof that may be susceptible to leaks.

Once the drip edge is in place, you can begin to lay down the shingles. If you’re using 3-tab shingles, begin with a starter row that has been cut to the right length, and then nail each shingle flush with its neighbor. It’s important to get this first row right, because the tabs on the shingles will be offset when you add additional rows.

Next, begin laying the other courses of shingles. If you’re using a gable roof, you will need to add a course every 24 inches. When you reach the end of an even-numbered row, snap a horizontal chalk line to serve as a guideline for the next even-numbered row. Continue alternating odd- and even-numbered rows until you reach the ridge.

When you start the last course, you will need to use ridge shingles that are trimmed down to fit the length of the ridge. The ridge shingles should overlap the previous course by 6 inches, and you should then trim any shingle tabs that are sticking out of the ridge cap to create a smooth surface.

Flashing

Flashing is a strip of corrosion-resistant metal bent into shape to fit over a joint and help prevent leaks in areas where water might seep through. It’s found where a roof intersects with other parts of the building or where projections like chimneys and dormers meet the wall. Without flashing, the intersections between these surfaces would be vulnerable to moisture, which can lead to expensive repairs and structural damage. However, a skilled roofing professional can install flashing to reinforce these weak spots and keep the home’s interior from getting damp.

Flashing is typically made from copper, lead or galvanized steel. It works by collecting pooling water and directing it away from the area. Most often, it’s used in areas where roof leaks are most likely to occur, such as valleys (the inward crease of a roof where two downward slopes meet) and around penetrations like skylights, vent pipes, dormers and chimneys.

Leaks in these areas happen when the flashing isn’t properly installed or damaged. This is why it’s important for homeowners to understand the basics of flashing so that they can make sure their roofing professionals are doing their job correctly.

There are several different types of flashing, and each one has its own specific purpose. For example, counter flashing is a piece of metal that’s usually placed at the base of walls and runs perpendicular to the siding. Kickout flashing is the lowermost step flashing at the bottom of a wall/roof intersection and is designed to deflect water down the side of the wall. Vent flashing is a custom piece of metal that’s designed to fit a particular type of roof vent, and it can be difficult to install properly.

Continuous flashing is a single piece of metal that runs the length of the area being waterproofed, and it’s usually seen where a sloping roof meets a vertical sidewall. It’s also sometimes used for roof valleys and at the rake edges of a roof.

While it might seem obvious that flashing needs to be installed in places where leaks are prone to form, not everyone knows that there are actually different kinds of flashing and what each does. It’s essential for homeowners to know the differences in order to have an informed conversation with their roofing professionals about which options are best for their homes.