Commercial real estate properties have unique standards and requirements when it comes to their roofs. Unlike residential roofs, these systems must meet strict function and design needs.
They also require roofing materials that provide better insulation, support eco-friendly initiatives and save on energy costs. Commercial roofs require specialized knowledge and expertise. That’s why it’s best to leave them to a professional like Commercial Roofing Boston MA.
Commercial roofing has come a long way from the rudimentary shelters of ancient civilizations to the diverse and sophisticated systems that we see today. The journey has been one of continuous evolution and innovation, a testament to the industry’s dedication to excellence and forward-thinking design.
The start of the modern era saw a shift in the types of materials used to construct commercial roofs. Traditional materials like coal tar pitch and felt were replaced by more advanced options like slate and wood tiles. These new materials were more expensive and weighed more than their predecessors, but they offered a more aesthetically pleasing look while being durable against harsh weather conditions.
With the Industrial Revolution came advancements in manufacturing processes, which made these new materials more affordable and accessible to a wider range of consumers. This paved the way for bituminous roof systems, which were a popular option due to their waterproofing properties and low maintenance costs.
Bituminous roofs were also the first to offer a lower profile and better resistance to UV rays, further increasing their popularity. In the 20th century, innovations in material technology allowed for the development of single-ply roofing systems, which blended modern and traditional materials for even greater performance.
This era was marked by the ongoing green movement, which saw the introduction of sustainable roofing solutions like living roofs. These roofs are covered with vegetation and a growing medium that is installed over a waterproofing membrane, and they offer many environmental benefits including reducing heat, improving air quality, and creating wildlife habitats. They also help reduce energy costs and contribute to carbon sequestration. This influenced the current state of the roofing industry, which prioritizes sustainability and efficiency. This means that roofs are now designed to meet the unique needs of each building and its occupants while maximizing efficiency and longevity.
Materials
Commercial roofing can have a much more varied scope of requirements than residential roofs. Choosing the right materials to protect your business will depend on several factors including durability, energy efficiency, and climate compatibility. Whether you’re looking for metal shingles, asphalt shingles, single-ply membranes, PVC, or even a green roof, each offers unique advantages to best suit your building’s needs.
The game changed for commercial buildings when synthetic materials stepped onto the scene in the 1960s. These new options gave builders and architects more freedom to design, while also being lightweight and adaptable in different weather conditions.
These synthetic materials include single-ply membranes like TPO, PVC, and EPDM. These roof systems are popular because they come in a single layer that’s easy to install, and they have a long lifespan of 30 years or more. They’re also highly reflective, which can help lower cooling costs. Plus, they’re able to withstand heavy loads and extreme temperatures.
Another type of single-ply membrane is a thermoplastic olefin (TPO) roof, which uses heat-welded seams to create an impermeable barrier. It’s durable and highly reflective, helping to lower commercial building energy bills. It’s also highly resistant to sunlight, UV radiation, chemicals, and fire.
EPDM is another synthetic rubber roof that’s commonly used for flat or low-slope roofs. It has a long lifespan, and it’s flexible and resists water, oil, and other contaminants. While it’s not the most visually appealing, its durability and cost make it an attractive option for commercial building owners.
For steep-slope roofs, asphalt shingles are still a common choice for commercial buildings. They are easy to repair, inexpensive to replace, and have a high tensile strength. However, they do not last as long as some other commercial roof options.
For a longer-lasting and more environmentally friendly commercial roof, you can opt for a flat roof system made from EPDM or TPO. This roof type can be topped with solar panels to increase energy efficiency. Alternatively, you can choose to add insulation to help lower your business’s energy bill. You can also go for a green roof, which is covered in plants and helps reduce the urban heat island effect.
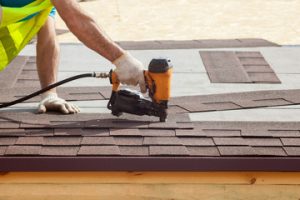
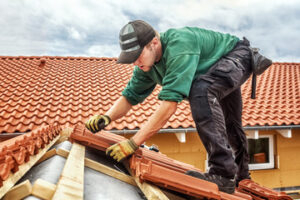
Installation
The roof on a commercial property plays a vital role in protecting the interior from weather elements, enhancing aesthetic appeal and promoting energy efficiency. Unlike residential properties, commercial roofing needs to comply with strict regulations and safety standards. This means a professional approach is required to install and repair them.
The underlying structure of a commercial roof consists of insulation, decking and various layers of protective coatings. The outer layer, which is often made of single-ply membranes like EPDM or PVC, acts as a barrier to water damage. This is essential for flat or low-sloped commercial roofs, which can easily pool and deteriorate under standing water. For this reason, it is important to ensure proper drainage with the help of roof drains and scuppers.
Proper ventilation is also necessary for a commercial roof to function properly. Plumbing vents, skylights and HVAC units all require proper sealing to prevent leaks and allow air to flow into and out of the building. Additionally, a well-functioning commercial roof will include adequate insulation to regulate temperature and reduce energy bills.
Commercial roofing contractors must be licensed, insured and offer a warranty to ensure quality installation and repairs. They should also be well-versed in the latest industry guidelines and construction standards to ensure compliance and adherence to safety regulations.
A reputable commercial roofing contractor should provide a comprehensive inspection process to identify potential issues and recommend the best solution. This will help in avoiding costly mistakes and potential damages down the road. They should also have a good track record of customer service and a commitment to providing sustainable solutions.
A reliable commercial roofing system is one of the most important investments a business can make for its property. It protects against weather conditions and other environmental factors, provides a positive first impression to customers and clients, and helps control temperature. In addition, a durable and functional roof can increase the overall value of the building. A poorly maintained or damaged roof can cause expensive and lasting damage, so it is crucial to keep up with regular maintenance and repair services to extend the life of the roof.
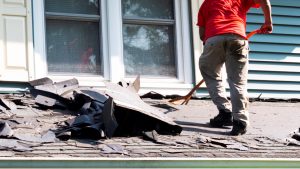
Maintenance
The condition of a commercial roof plays an important role in protecting a business’s investment. Unchecked problems with a commercial roof can lead to expensive repair costs, unfavorable curb appeal, and even structural damage to the building. Regular inspections and maintenance can help prevent problems and extend the lifespan of a commercial roof.
The roof is one of the most under-appreciated aspects of a business, so it often goes overlooked until there’s a problem. Then the roof becomes a source of stress and frustration for the business owner. Keeping the roof in good condition can save a business money in energy costs, repair costs, and loss of productivity.
Because they are larger and often more flat than residential roofs, commercial roofs require more routine maintenance and inspections to prevent leaks. Some types of commercial roofs also require specialized maintenance techniques and equipment, such as for accessing hard-to-reach areas or for sealing leaks on single-ply roof membranes. Regular inspections can spot issues and repairs, such as seam failures, punctures, or tears. A leaky roof can cause water pooling, which causes further damage to the roofing system and can affect the interior of the building.
A well-maintained roof extends its life expectancy beyond the warranty period, reducing total and annual cost of ownership. It can also contribute to energy efficiency and support green initiatives, which may qualify a commercial property for tax benefits. The most effective way to maintain a commercial roof is through a comprehensive roof maintenance contract. This includes routine inspections, emergency response time, and other services.
Commercial building owners should also understand their lease terms and property taxes when managing maintenance costs. This information can be valuable for planning budgets and ensuring that the roof remains within its legal boundaries.
When choosing a commercial roofing contractor, ask about their supplier relationships and their warranty policy. This will give you confidence that they use high-quality materials and can back up their claims. Additionally, make sure that they provide a service guarantee, so you are protected in case the roofing work is not up to standards.